Install Espframe on a Guition ESP32-P4 Display
Flash Espframe to a supported Guition ESP32-P4 display from your browser — no desktop toolchain or ESPHome required.
What You'll Need
- Supported Guition ESP32-P4 display, USB-C data cable (not a charge-only cable), Immich server on your network (immich.app), and an Immich API key
| Model | Panel | Stand |
|---|---|---|
Guition ESP32-P4 10" JC8012P4A1, original and new panel revisions | AliExpress | MakerWorld |
Choose the Correct Panel Firmware
The two screen revisions look almost identical, and the newer one may not say V2. Check the small four-digit number printed on the rear case:
2627or lower: choose Original panel.2628or higher: choose New panel.
Both revisions have the same JC8012P4A1 model name and 1280×800 layout, but they require different display startup settings. If the wrong firmware is installed, the picture may be distorted; return here and install the other profile.
Connect the Display
The device has two USB-C ports. Plug the cable into the bottom port (labeled USB on the PCB) — the one closest to the edge, next to the USB-A connector. The upper port is for the screen ribbon cable only.
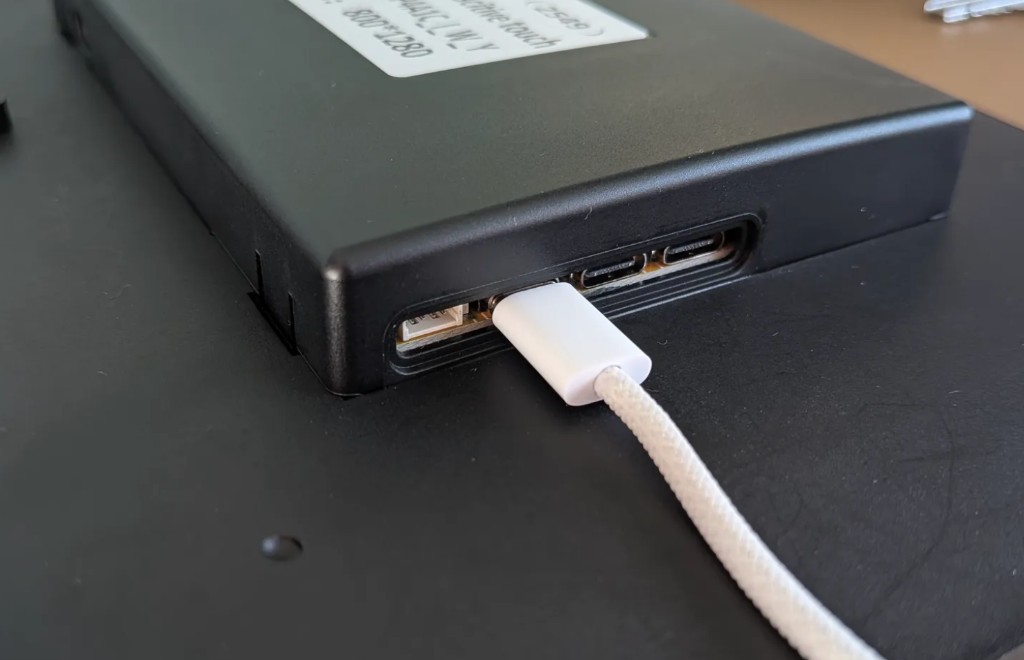
Wrong port?
If flashing fails, make sure you're using the bottom USB-C port as shown above. The upper port will not work for flashing.
Web Installer
Connect the display via USB-C, select the profile matching the rear-case number, then click install.
Browser
Requires Chrome or Edge on a desktop computer with Web Serial. Safari and Firefox not supported.
Steps
- Connect — Plug in with USB-C; allow drivers if prompted.
- Flash — Click Install Espframe for Immich, choose the device’s serial port, confirm. Takes a few minutes.
- WiFi — Enter network name and password when prompted. If no prompt appears, open the WiFi settings on your phone or laptop and look for the frame’s WiFi hotspot: a network starting with ESP_, such as ESP_7A1EED. The letters and numbers after ESP_ come from the frame’s MAC address (its network identifier), so your frame’s name will be different. Connect to that network, then follow the setup page (captive portal) to enter your home WiFi details. If the page does not open automatically, visit
http://192.168.4.1. - Immich — Open the device IP in a browser (shown on screen), enter Immich Server URL and API Key. The URL can be an IP address such as
http://192.168.1.30:2283or a domain such ashttps://photos.example.com. See API Key for permissions. Photos start loading. Next: Smart Photo Filters to choose what to display.
The setup wizard defaults to 24 Hour clock format, Europe/London (GMT+0) timezone, shows the clock by default, and uses 0.pool.ntp.org, 1.pool.ntp.org, and 2.pool.ntp.org for time sync. Pick your timezone during setup so the clock and sunrise/sunset based brightness and night tone are calculated for your location. The on-screen clock refreshes every 60 seconds.
Choose whether the on-screen clock uses a 24-hour or 12-hour format.
Recent firmware notes
- Multiple Album, Person, or Tag IDs: Saving comma-separated UUID lists uses a POST body so long lists no longer hit 414 URI Too Long. Album IDs, Person IDs, and Tag IDs are still limited to 255 characters each; see Photo Sources.
- Photo date filters: The web UI now supports fixed date ranges and rolling ranges such as the last 6 months or last 2 years. See Photo Sources.
- ESPHome 2026.8: Current local builds use ESPHome
2026.8.2; manual builds also include compatibility fixes for ESPHome 2026.3, 2026.4, and 2026.7 LVGL changes.
